Inspired by the Example on the Creators Club I decided to write my own so it
would do the stuff I needed it to. As always the one on the Creators is great
and a nice starting point.
This is written from scratch and instead of releasing the code I might just
put it up as a binary for you to bolt into your projects, naturally you will be
able to inherit from it and create the menus you want from it.
As the image I put up does not really show what is going on I have put up a
short vid (here) to
demonstrate some of the things it can do.
Features:
Based on GameComponent so you can just add it to your game
via Component.Add
Ability to texture your fonts
2D shader effects on both the menu, fonts and cursor
Menu cursor driven by the keyboard or 360 Controller
There are only a few effects at the moment but I plan to add more, still much
to do, but once done I think it will be useful.
Well here is my rolling fog. The sample download has two projects, one for
XNA 1.0 Refresh and the other for XNA 2.0. I got it up and running on my 360,
but for some reason on there the textures got mashed, the fog was fine though. I
will have to look into coding shaders for the 360 more, must be me doing
something silly...
Also forgot to mention on both the other shader fog posts and this, that the
models for the building were from 3DRTin the free download section.
Well as mentioned in my previous post, here is the 3D particle system again
only this time the particles are scaled. Now I didn't think that you could scale
pointsprites, but it turns out you can :P
I found out after going to an XNA meeting set up by the .NET Developer Network, a friend of
mine, Dave, was giving a talk there and so I tagged along and was interested to
see another speaker, Peter McGann, describing his game being demoed and as he
was talking us through it he happened to mention that his particles were point
sprite particles and I noticed they were being scaled, so I asked how he was
doing it and he said he would mail me the shader. In the mean time I got home,
and me being me wanted to know how it was done so mailed Leaf, who sent me
almost an identical chunk of code as Peter McGann then sent me.
So thanks to both of you for showing me how this is done.
Basically you need to set up a parameter in your vertex shader return
structure that tells the hardware to scale the point sprites, this is done with
the PSIZE semantic. In the vertex shader you can then calculate the size the
given particle needs to be. In my shader I have set a default particle size that
can be altered by passing in a new value as well as the height of the view port.
You will find 4 projects in the download, 2 for XNA 1.0 Refresh with one
being for the PC the other for the XBox and the same again for XNA 2.0
Well it's almost here and as you can imagine, I will not be posting as often
due to the holiday season, so I thought I would let you know what I am thinking
of doing in the new year.
Next few posts will be relating to scaled point sprite particles and simple
physics, my current point sprite
particle system is not scaled which is fine for a close up particle effect
but it lacks volume, the next point sprite particle system will remedy this. I
have not really looked much at game physics but the more I play and write the
more obvious it is to me that regardless what game it is you need some form of
rudimentary physics (I know it's a no brainier!) I guess there are a few physics
engines out there like BulletX
and JiggleX etc.. but personally I
like to reinvent the wheel, that way I know exactly how the wheel works
(admittedly, not all of my reinvented wheels are perfectly round..) Also I think
it would be nice to have a physics engine that covers all the very basic
elements that will be required by a home brew game.
Also in the new year I intend to be going back over my Generic XNA posts and
convert the projects over to work with XNA 2.0 and now that I have a Creators
Club subscription on the XBox360. I also intend to revisit a few topics like A.I
and the FSM to add messaging between agents and singleton states and the Sky
Sphere and clouds aiming to give more volume. I just hope I can get it all
in!
So planed for the new year:
Scaled PointSprite Particles
Simple Physics System
Revisit old topics and improve on or add to.
Download Projects to include XBox 360 Projects
Download Projects moved to XNA 2.0 (once on full release)
I am kind of hoping I can get the particle system out on here before the end
of the month, but if I don't, then Merry Christmas to all those that read this
blog, hope you have a good one :)
I have altered the shader a bit since my last post. I now only use a single
cloud texture, sample that three times and rotate each sample over the other and
add the result to the sky color. I have done this as passing more was having an
impact on FPS.
So I have added two new functions to the shader to do the rotation of the
textures.SwirlHoriz and SwirlVert.
SwirlHoriz: This function is used to rotate the cloud
texture horizontaly around the sky sphere, either clockwise or
anti-clockwise.
I have named this source Cloud I as I have just got a new book on HLSL and so
I feel I will re work this at some point, in the mean time, here is what I have
done.
OK, have a major project on at work, but still finding time to play with this
:P Just so you don't go reading the whole post and then find there is no source
link at the bottom, there is no source with this post.....
Right, so I wanted to add clouds to this shader and I thought, a Perlin noise
generated cloud system would be great! So I set off down the road of getting a
Perlin noise generation function into my shader and I first came across
ret
noise(x). Alas, the first incarnation of this page told me it was
available from PS 1.1 up to PS 3.0 (it has changed now:P) and so for a few hours
I tried to implement this function in my shader but the swine would always
return 0.....not much noise eh. So I asked around the community and it turns out
that this intrinsic function is not available :)
So my next stop was to get a Perlin equation (remember I have no education so
unlike you guys I had to look this stuff up) I found plenty of examples
including a talk from the man himself! But due to the very small
area of my brain where I store my maths stuff I thought "Hey! I am sure there
must be an NVIDIA shader out there that has noise!" and indeed there are. I
then set about bolting in a function from an NVIDIA shader; think it was the
Dura wood one, anyway, got that in there and compiled................turns out
my shader combined with this method turns out to be "too complex" would you
believe, even if I put in multiple passes. In the end I have decided to fake my
Perlin noise clouds. I use a few images generated in photoshop using the cloud
render. over lap these and rotate them either vertically, horizontally or even
both either clockwise or anti-clockwise giving me my cloud effect. I use one
image as the cloud base and another two to subtract from it giving me separate
clouds.
Here are a few pictures to show you how I am progressing:-
This is the first image I took, this is a single cloud texture with no
rotation
As you can see, not much definition.
Still a single texture but I increased the intensity (first two images
played at *.5) and with horizontal rotation
Looks like we have some kind of cloud effect.
Now these are where I am up to now, 3 textures, the first horizontally
rotated clockwise, the second horizontally rotated anti-clockwise and the third
has vertical and horizontal rotation.
May not be the greatest cloud system yet, but I am liking the results so far.
As ever you comments and input are welcome, don't be shy.
Well this is the source post for my terrain and road map stuff. I will
briefly describe what I have added and then onto where the source download
is.
So all I have done is add another Vector4 to the vertex element that
holds the weight of the given road texture to be drawn. This then needed a new
string array to hold the asset paths and an array of Texture2D's, one for the
textures and one for the normal maps. Also a new texture to hold the road map
it's self.
I added code to the LoadData method to store the road map weights
for the three road channels, the LoadGraphiceContent method gets altered to load
the extra textures, and naturally the Draw method and constructor.
I have
also added an ambient light parameter, but this was a precursor to what I am
doing with the Dynamic Sky Sphere so it is not used much here.
I also intend
to add a GetRoadChannel method so that you can tell if you are on a road and if
so, what road you are on so if you are using it for an off roading type game
then you can alter the physics when the car is on or off the road. Might even
extend this to the terrain weights too as driving over grass will be different
to driving over sand or stone.
I know, how many times can a guy extend a terrain class!!!!? Lots I guess,
this extension to the class and shader adds another map image that I call a road
map. As you can guess this image holds a map of where I want to draw roads on my
terrain. It is made up of four colors, Black (no road), Red (road texture 0),
Blue (road texture 1) and Green (road texture 2).
I have extended the vertex
element to hold another vector 4 for the "weights" of each road type, I have not
used the W of the Vector and have it there for now as an extra info element (not
found a use for it yet, guess I could add another road texture)
I will upload
the source once I have tidied up the code. As ever, here are some shots...
I am posting the source to this now as I have a project at work that is going
to take up my time over Christmas and into the new year and also have to start
studying if I am going to get anywhere with my Microsoft Certification :( I am
not going to have chance to add any more to it.
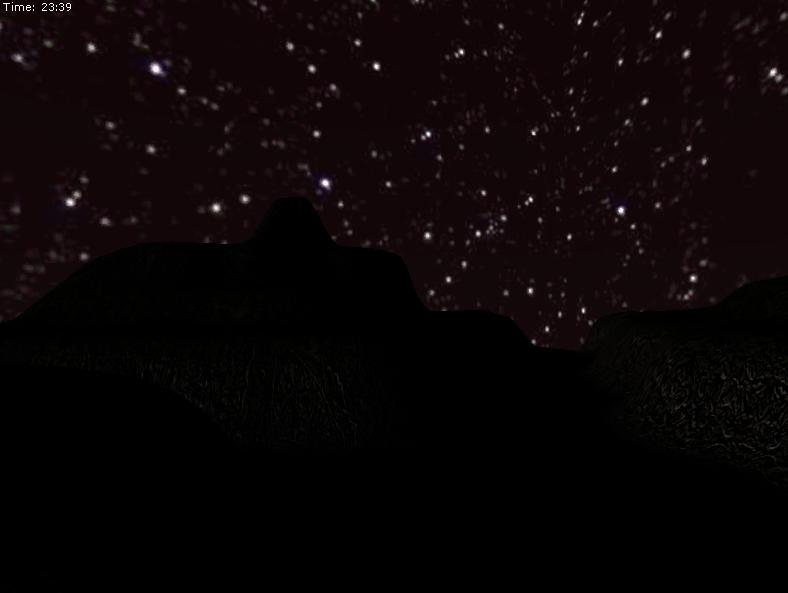
So this is the project as it currently stands. I have modified the SkyBox
class, adding a public field called SunPos so that other objects in the scene
know where the sun is and can use that for there main lighting source, there is
also an Update method in there now which calculates the time of day to be passed
to the shader, this can either be generated by the class or it will use the
system time (default). As I said in my last post, I have added a point light to
the terrain shader so you can navigate at night.
Controls ESC - Quit WASD - Translate the camera. Mouse -
Rotate Camera F1 - Real time F2 - Game Time (not to be confused with
GameTime object) L - Light On O - Light Off
I guess this started out as a bit of a toy. Using my old skybox code, I
thought it would be a good idea to have the shader manage the lighting of the
sky, you know have like a nice sun rise/set, have the color of the sky slowly
change over time. But as I was using a box it meant that you got some corners in
the sky, now I have done some things in my youth that have altered my perception
of the world around me, but nothing ever put corners in the sky.. So I thought
about using a sphere, so I built one in Blender3D and UV'd it as a sphere so I
would get a nice set of tex-coords.
As you can see from the screen shots I am also passing the lighting position
to the terrain shader as the time passes. I have also added a point light
calculation to the terrain shader so you can see where you are going in the
dark.
This is going to be an on going project of mine, at the moment there is no
"Sun" in the sky sphere and I want to add weather to it (clouds etc..), it may
well be out side my technical capability, but I wont know until I try :)
In my next post I will describe the shader as it currently stands. As ever
your comments are welcome.
Here are a few shots to be getting on with.. (notice the time of day in the
top left hand corner of each shot)
Well thanks to Ultrahead and his blog
he gave me, I have been able to put this example up of a OOBB (Object Orienated
Bounding Box). Using the same code from the last project I have added the source
from Minh at Channel 9. Took
me a while to get it integrated as he is creating the roataiton from a vector
where I am using a Quaternion and his example does not use any scale, so for a
noob like me it took a bit to get going.
But I have it here now, so I hope you find it of some use.
Oh, and thanks Minh for putting your source up for us to learn from and to
Ultrahead for puting it infront of me.
GenericXNABoundingBoxExample2.zip
The idea for this post came from a thread I spotted on the XNA Creators Club Forum. I
read in the thread that you can't have your bounding box's rotate, now when I
debug my collision stuff I tend to draw my bounding box's so I can see them in
action and so I assumed that my bounding box's were rotating with my models.
Turns out they're not. I guess I just assumed that the bounding box was part of
the model, and so when I rotate the model the box rotates with it, this was
re-enforced by me seeing the boxes that I have drawn rotate with the model. What
is actually happening is the corner co-ords of the bounding box are being
transformed in the shader that is used to rotate the model and so the link
between bounding box and model orientation was made, but on the CPU the bounding
box is still aligned to the world and not the object.
The models used are in X and FBX format (box2.fbx and sphere.x)
So in my attempt to try and get this to work, I have come across some new
lingo; AABB, which is a Axis Aligned Bounding Box and OOBB, Object Orientated
Bounding Box. The BoundingBox object we get with XNA s the former (AABB) so it
is always aligned with the World axis and has no correlation with the objects
rotation. Where as the latter takes into account the objects rotation.
I then thought, "If I transform the corner vectors with the world matrix,
I could then have a OOBB!", alas, the native Intersects method of the XNA
BoundingBox uses a AABB check no mater what I did with the co-ords. So this lead
me to my current fudge :)
I guess the guys in the XNA Creators Club Forum are right to get true OOBB
you need a third party physics component. Be nice to find out how this is done
correctly though.
Basically I have taken each corner of the AABB and at that point put a
BoundingSphere, so for each corner the collision method will check if any of the
corners have collided with the other model.
In this example I have put the custom content pipeline to generate your
bounding box data, in the model class I have put properties that then retrieve
it and a method to manage the collision detection. This, as ever, is very basic
but it illustrates regular bounds collision and shows how I have tried to
implement a OOBB workaround.
Well here is the same skybox, terrain and ocean objects, only this time I
have added the fogging effect to the shader. Naturally the class' have had to be
modified to pass the fog parameters and I have added a global static class that
stores the fogging parameters that are to be applied to each object in the
scene.
In the shaders, I have placed the fogging code into the second pass, in the
case of the sky box this is not really needed as this shader uses very few
instructions, but as for the terrain and ocean shaders they both touch the
bounds of the PS instruction sets for the shader model I can use (SM2 64
instructions). You will also notice that the ocean that I have had to use COLOR
channels for the return values from the vertex shader, this is because SM2 will
only go as far as 7 texcoord channels (TEXTCOORD7), if you have the luxury of
being able to use SM3 then you will be able to change these to TEXCOORD8. I also
had to remove the old TEXCOORD7 so that I could use it for my WorldPos
parameter, instead of this being passed, it is calculated in the pixel shader
and so elevated the channel for this use.
Also in all the shaders I have decided to manage the render states in the
passes, you may want to moth this to the code, but I guess it depends on how you
intend to implement it.
So the controls are the same as the last post, but you can now switch the fog
on or off with F - fog on (default) or O - fog off.
Right, decided to move this component from the engine and into my Generic XNA
section, I know what you are thinking, "I have gone through all your bump
mapped terrain stuff, I don't need this as a generic drawable game
component!!", well that may be the case, but I have put a few fixes in here
to do with the terrains tangent generation and also some of the lighting in the
terrain shader I wrote. So you might find it of some use after all. I have also
tidied it up, the one in the engine does the job but I really did leave it in a
right mess.
As to the Ocean code, I have included it in here as I have updated the class
so that this too is a full drawable game component.
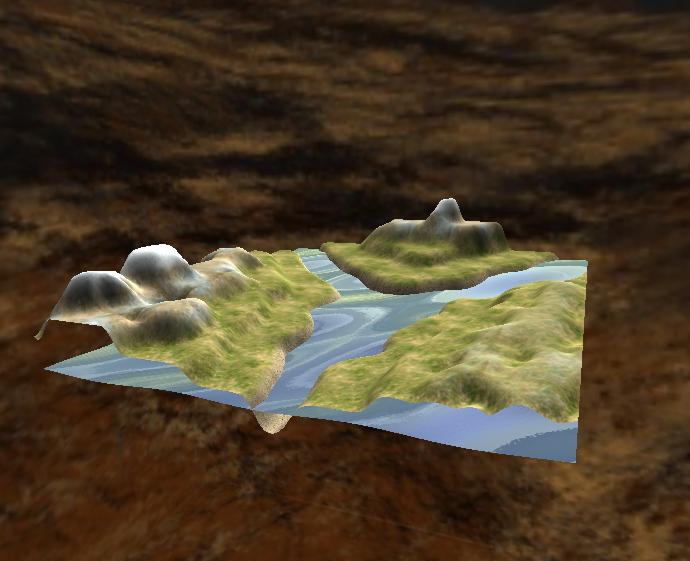
OK, on to what I have done here. I found that the way the terrain use to
calculate its Tangent data, in some lighting conditions, you would get an odd
effect where the edge of your terrain would get lit brighter than anywhere else.
This was because the loop that generates the Normal and Tangent data starts at 1
and ends at the the terrain width/height -1 in both the x and y loops. So what
happens is you end up with all your vertices's at the edges having crappy
tangent/normal data and so get this odd edge effect which looks like this.
As you can see in this image the edge is far too bright.
Also the book I got the shader code from was quite old and used the old
DirectX draw order and so used the Z as the Up/Down axis and the Y as the depth
axis, this lead to some odd lighting (IMhO) so I "think" I have fixed this in
the shader by just altering the lighting swizzle.
I have also tidied up the PickTerrain method and made it a little neater to
read and a little bit more usable (from a user point of view). So you could now
use this functionality so your player or even you can graphically create your
own terrain and see it exactly as it is rendered.
As I said before I have also reworked the Ocean class so that it is now a
drawable game component. The only thing you have to really look out for is the
order you add the objects to the Component list if you want to use transparent
water. Just make sure you set the draw order higher than the terrain so that the
terrain is drawn first. Also cleaned up some of the render state settings used
to get the transparency, turns out I did not need half of them...
So now you have terrain class that can be dropped into any XNA project, and
an ocean shader that is now pretty much self autonomous.
Controls: WSAD - Translate Camera Mouse -
Rotate Camera Left Click - Raise Terrain Right Click - Lower
Terrain F1 to F12 - alter Ocean parameters F1 & F2 - Switch
Alpha On/Off F3 & F4 - Alter Ocean Color F5 to F10 - Vary wave
amplitude, frequency and bump height F11 & F12 - Sparkle
On/Off Esc - Exit
I have a great book Programming
Game AI By Example by Mat Buckland. The first chapter was an eye opener for
me as it is a Maths and Physics Primer which is just what I needed, I have not
used either of those parts of my Brain since 1988 and they are a bit whithered
:P
Anyway I digress. The next chapter is on Finite State
Machines (FSM), I have a little experience of these having played with
writing very simple CA's (Cellular Automata) way
back when.
So I thought, "I have not seen any examples for A.I in XNA yet,
wouldn't it be nice, using the examples in this book to come up with a FSM A.I
for XNA" So that is what I have tried to do here in this post.
The basic model I put forward here IMHO is quite extensible, you have two
base class's and an interface, the BaseAgent, BaseState and IBaseAgent. These
objects are the framework of the FSM, to create a new Agent just inherit from
the BaseAgent and create an agent interface to go with you new Agent class off
the back of IBaseAgent and create your new states inheriting from the BaseState
for each, then have your None Player Character or Bot (NPC) inherit from the new
interface and write your AI logic for your NPC in the interface stubs.
In this example project I have just implemented the base states:
Patrol Fight Flee isSafe runAway
I guess these are the most basic items an NPC will need, you can always add
other states like Seek and Chase or anything else you may need your NPC to
do. The NPC Patrols...
The NPC Fights!
The NPC Flees!
Again, this is a simple
example, but I hope it gives you a base to work from and develop your own FSM's
and as ever, if you think I am going about it wrong, leave a comment, it's the
only way I can improve my examples.
Controls
AWSD - Translate Camera
Mouse - Rotate
camera.
Move to the plane while it is patrolling in a circle, it will engage
you and once it has lost enough hits will flee (don't worry, it loses hits just
by being close to you)
I have moved this shader and it's associated class over to a generic XNA
class. This should make it easier to bolt into your own projects should you not
want to use the Randomchaos3DEngine as your base.
I guess the idea for this came from Bioshock, a few weeks a go a friend of
mine asked if it was possible for my to create an underwater post process effect
for him (thanks for the idea Dave).
I already had a shader from Microsoft (can't remember where I got it) that I
used for a nice ripple effect on 2D images, so I thought I should be able to
adapt that to do this effect. And that is exactly what I have done with
this.
It is not perfect as I am using a shader that was not intended for this
effect, but it gives you an idea of how to go about doing it.
Here is a shot of the shader being used as intended on a background image.
The post processing code in this sample is all thanks to Chr0n1x, with out his tutorial written for
the HazyMind Engine I would not have a clue how to create post processing
effects.
Controls Esc - Exit AWSD - Translate Camera Mouse -
Rotate Camera
I have a few examples using custom pipeline code on here, now an issue I get
a lot, mainly because I have next to no modeling skills, is when I try to use a
new model that has been UV'd I get compile errors because the UV texture that is
embedded in the model file is not present or in the right place. So I have to
find the texture file reference in the model file and remove it, but some times
the models are not plain text so I have to find the physical texture file (or
create a dummy) put it in the right place then compile again.
Now I find this a real pain in the back side, I also then have textures
in my projects I may not want to use if I cant pull them out of the model file.
So I have found a nice simple solution to my problem, override the
ConvertMaterial method in the ModelProcessor and just ignore any texture
exceptions.
Now I have had a hell of a game with this in the past and have now come
across a few people who have had the same or similar issues that I have had. So
I have decided to put up and example of how to do this. The example given on
theCreators
Club is great, but relies on you embedding your textures in the mesh you
intend to bump. This is all fine, but if you have one model and you want to
apply different textures to different instances of it then this method is
limiting.
So I have decided to post up my code to do this. Now as I said before, I
have had a right load of trouble with this right from the start, you can see my
tales of woe on the HazyMind
forum and on the XNA Creators
Club forum, as usual a HUGE thanks goes out to Leaf from the XNA UK User Group
So my initial issue was that I didn't know that certain model formats do
not come with tangent data in them, at least that is what I am told. So I
started off trying to apply my shader to an X formated mesh and got some really
odd results (see the HazyMind posts), after much time and with the release of
Benjamin Nitschke's book on XNA I found out thanks to the guys on the HM forum
that you have to pass the model through a custom content importer and generate
your tangent data there.
So I added to my existing custom model content pipeline, but did not get
the method of generating the Tangent data correctly. Now this gave rise to some
really odd results, basically the models would have my old issue when I did not
have my bumped terrain in the draw call, but one it was drawn it got the effect
rendered correctly. This was because before the terrain was rendered there was
just random data in the Tangent Chanel that was being passed to the shader, once
it was drawn and by sheer luck the tangent data from the terrain object just
happened to sit in the same memory location as the unassigned tangent data for
the model, so giving the illusion of the bump effect. So when my applications
were ran on other systems the bump effect just did not work.
Here is and example of a custom content pipleine class for the model to
be bumped
using System; using System; using System.IO; using System.Collections.Generic; using Microsoft.Xna.Framework; using Microsoft.Xna.Framework.Audio; using Microsoft.Xna.Framework.Graphics; using Microsoft.Xna.Framework.Input; using Microsoft.Xna.Framework.Storage; using Microsoft.Xna.Framework.Content; using
Microsoft.Xna.Framework.Content.Pipeline; using
Microsoft.Xna.Framework.Content.Pipeline.Graphics; using
Microsoft.Xna.Framework.Content.Pipeline.Processors; using
Microsoft.Xna.Framework.Content.Pipeline.Serialization.Compiler;
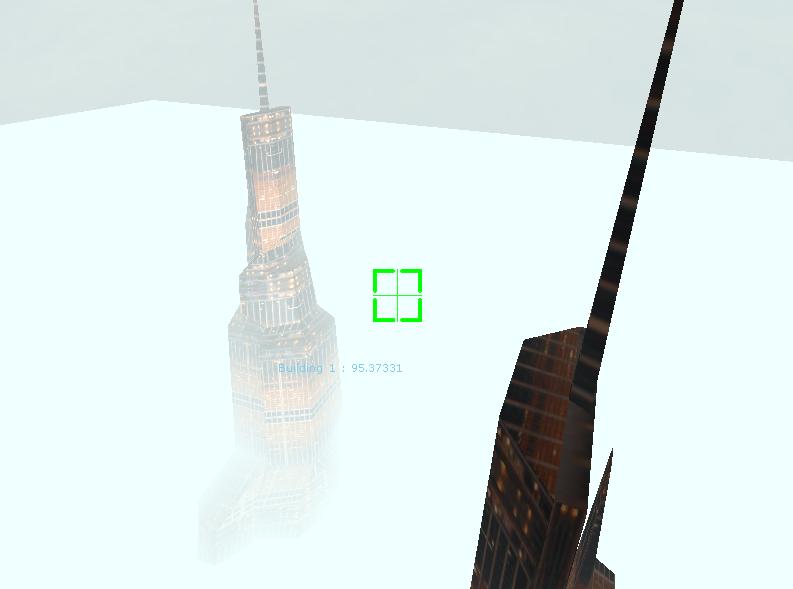
So here is the SM3 (Shader Model 3) HLSL fog. Now this is taken pretty much
99% from Leaf's example, but thought I would comment on how easy this technique
is to put into your existing shaders.
I also found that adding this to a
shader pushes the operation count up a fair bit, the limit in SM2 is 64
operations per shader, so 128 in all, 64 in the Vertex Shader and another 64 in
the Pixel Shader. So What I did was put the fog code into a second pass so
giving me another 64x64 operation slots to play with.
So here are the
shaders:
This first shader is the one used for the buildings you see in the
shots, it is a single pass and a simple texture
shader.
And finaly this is the shader used for the sky box, now, you may think, why
is he using a sky box when he has such dense fog? Well it is here as an example
and this is where I have put the fog calcs into the second pass so you can see
how to do it (or rather how I did it)
OK, may be a bit of an odd post, but I thought I would put it up any way.
I have 2 methods for creating a skybox now, either by using 6 textured
quads and positioning them around the camera at set distance and scale or using
an inverted cube mesh and then applying a cube map texture to it. So for both
these methods I need textures to generate these skybox's, and the majority of
images I have found were in cube maps but this then means that I can only use
them in one of my skybox methods.
So I had a look at the DirectX Texture tool to see if there was a way to
dissect a cube map there (as this is where I create my maps at the moment) but
could not find how to do this here. So I decided to write my own.
In short,
what I am posting here is a method to take a given cube map and break it up into
it's 6 constituent parts and save them as jpg files so you can use them in the
textured quad skybox method.
I guess you could reverse this to take 6 images and generate a cube map
possibly to build a cube map to be used as an environment cube map used in a
reflection shader or just to create a cube map for a skybox.
I intend to post an example of creating cube maps on the fly so that
reflective shades will give true reflections.
The initial notion for this came from this site here where the author gives a basic
example of a particle system. The particle shader used in this example is in
fact from the very example posted there. I have tried to visit this link at the
time of writing this post and it looks like the site is under development.
As you can see in the example this particle system can manage up to 10K
of particles without dropping the FPS below 60 which I think is quite good as my
previous attempts, first using a textured quad (you can see this if you take a
look at my RCSnow class in the Randomchaos3DEngine source) gave poor performance
at around 1.5K particles and another system I wrote using a single draw with a
vertex array was pretty efficient at low particle counts like 2 or 3K but 10K
gave a big drop. You also have to keep in mind that the screen shots were taken
on a crappy old laptop that does not have the resources to do any real 3D, I
will have to run it on my desk top and see what FPS I get then...
In this example there is also a FPS class so you can calculate you FPS
(Frames Per Second). Also a method of displaying text using the native XNA
Refresh methods rather than Nuclex Fonts. I am also reusing the SkyBox and
Camera class show in the last example.
I guess the next step will be to do ALL the particles physics on the GPU,
one step at a time eh...
Controls Mouse to rotate camera. Arrow keys to translate
camera. Escape to exit. F1 - F10 alter number of particles F11 &
F12 switch between particle modes. R,G,B & C to cycle particle colours
from Red,Blue,Green and
Random
Any comments on this example, please post them here, especially if you
are getting great FPS, be nice to know how many particles it can render and keep
the FPS over 60


.JPG)